How to Upload .csv File Into Rstudio From Chromebook
- Introduction
- Transform an Excel file to a CSV file
- R working directory
- Go working directory
- Set up working directory
- Convenient method
- Via the console
- Via the text editor
- Import your dataset
- Convenient way
- Via the text editor
- Import SPSS (.sav) files

Introduction
As we take seen in this commodity on how to install R and RStudio, R is useful for many kind of computational tasks and statistical analyses. However, it would non exist so powerful and useful without the possibility to import datasets into R. Every bit yous will almost likely use R with your ain information, being able to import it into R is crucial for any user.
In this article I present two different ways to import an Excel file; (i) via the text editor and (two) in a more "user-friendly" way. I also discuss nearly the main advantages and disadvantages of both methods. Note that:
- How to import a dataset often depends on the format of the file (Excel, CSV, text, SPSS, Stata, etc.). I focus here only on Excel files as it is the most common blazon of file for a dataset
- There are several other ways to import an Excel file (probably even some I am non aware of), merely I present the two most simple nonetheless robust ways to import such files
- No matter what type of file and how y'all import it, there is one gold standard regarding how datasets are structured: columns correspond to variables, rows correspond to observations (in the broad sense of the term) and each value must take its own cell (known as tidy format):

Structure of a dataset. Source: R for Information Science by Hadley Wickham & Garrett Grolemund
Transform an Excel file to a CSV file
Before dealing with the importation, the first thing is to alter the format of your Excel file to a CSV format.1 CSV format is the standard when working with datasets and programming languages as information technology is a more than robust format compared to Excel.
If your file is already in the CSV format (with the extension .csv), y'all can skip this department. If the file is not in the CSV format (for example the extension is .xlsx) you tin can hands transform it to CSV past post-obit these steps:
- Open your Excel file
- Click on File > Save equally
- Choose the format .csv
- Click on Save
Cheque that your file finishes with the extension .csv. If that is the case, your file is now ready to exist imported. Only showtime, permit me introduce an important concept when importing datasets into RStudio, the working directory.
R working directory
Although programming languages may exist very powerful, it often needs our help and importing a dataset is not an exception. Indeed, before importing your data, you must tell RStudio where your file is located (so permit RStudio know in which binder to look for your dataset). Simply earlier this, permit me introduce the working directory. The working directory is the location (in your calculator) of where RStudio is currently working (in fact RStudio is not working beyond your entire computer; information technology is working inside i folder of your computer). Apropos this working directory, at that place are ii functions that we will need:
-
getwd()(wdstands for working directory) -
setwd()
Go working directory
In most cases, when yous open up RStudio, the working directory (and then where it is currently working) is different than where your dataset is located. To know what is the working directory RStudio is currently using, run getwd(). On MacOS, this role will most probable return a location such as "/Users/yourname/", while on Windows information technology will most probable render "c:/Documents/". Do not worry if your working directory is different, the well-nigh important is to set the working directory correctly (then where your file is located) and not where it is now.
Set working directory
As mentioned before, your dataset is almost likely located in a different location than your working directory. Without any action from you, RStudio will never be able to import your file as it is non looking in the correct folder (you lot volition encounter the following mistake in the console: cannot open file 'data.csv': No such file or directory). Now, in social club to specify the right location of your file (that is, to tell RStudio in which folder it should look for your dataset), y'all accept iii options:
- the convenient method
- via the console
- via the text editor (see beneath why information technology is my preferred option)
Convenient method
To prepare the correct folder, then to ready the working directory equal to the folder where your file is located, follow these steps:
- In the lower right pane of RStudio, click on the tab "Files"
- Click on "Dwelling" next to the firm icon
- Go to the folder where your dataset is located
- Click on "More"
- Click on "Set Equally Working Directory
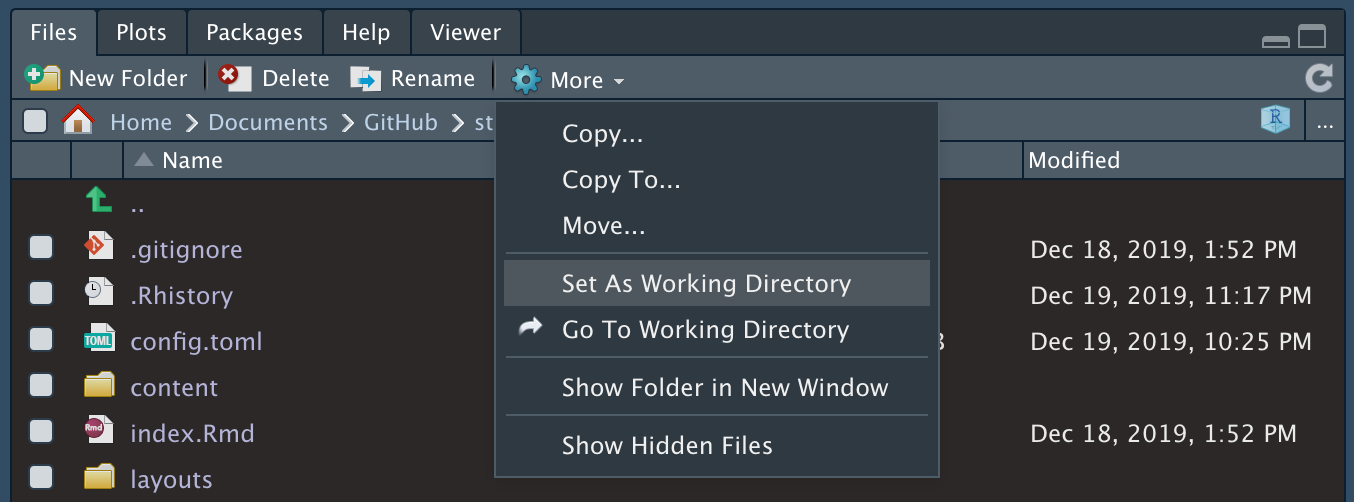
Set working directory in RStudio (user-friendly method)
Alternatively, you lot tin can also set the working directory by clicking on Session > Set up Working Directory > Choose Directory…
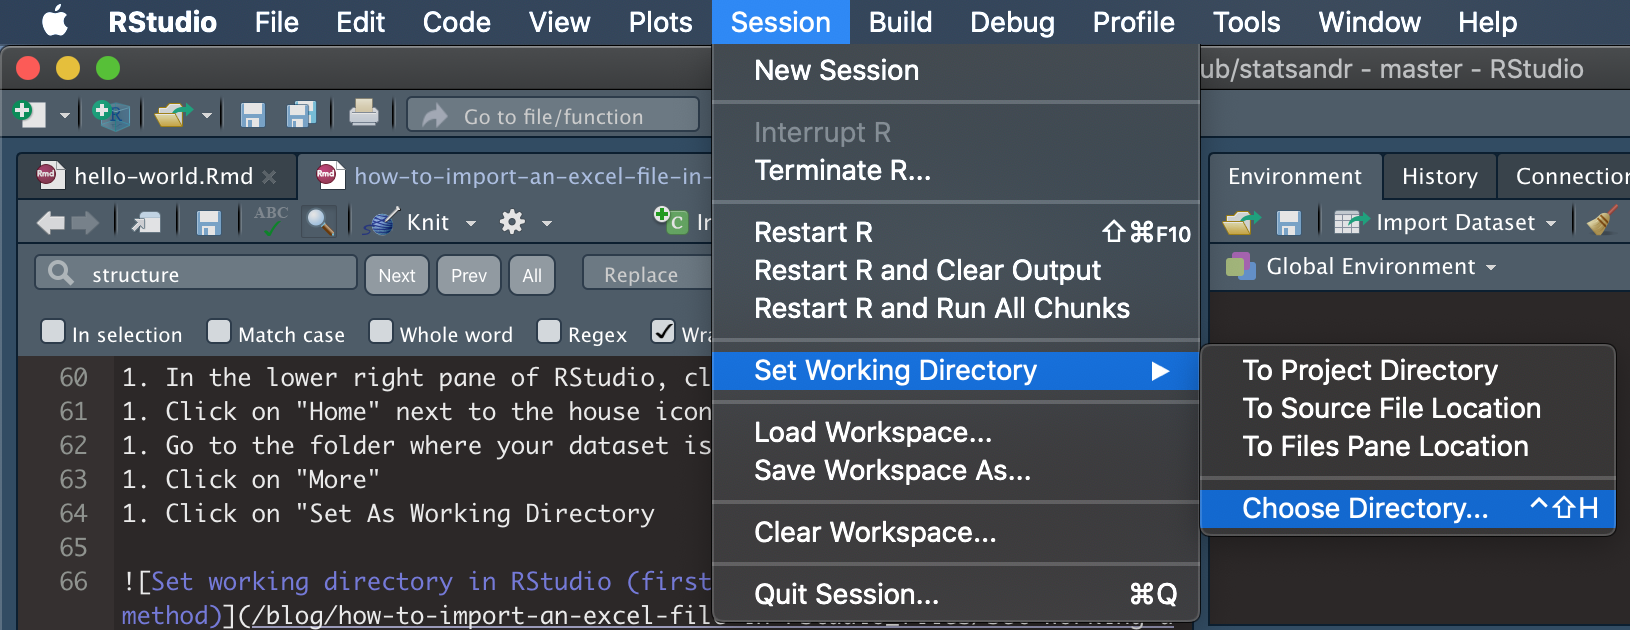
Set working directory in RStudio (user-friendly method)
Every bit you can see in the console, any of the two methods will actually execute the code setwd() with the path to the folder you lot specified. And so past clicking on the buttons you actually asked RStudio to write a line of lawmaking for yous. This method has the advantage that you do non need to think the lawmaking and that y'all will not brand a error in the proper noun of the path to your binder. The disadvantage is that if yous leave RStudio and open it again afterward, yous will have to specify the working directory again as RStudio did not save your actions via the buttons.
Via the console
You can specify the working directory by running setwd(path/to/folder) directly in the console, with path/to/folder being the path to the folder containing your dataset. However, you will need to run the command again when reopening RStudio.
Via the text editor
This method is actually a combination of the two above:
- Fix the working directory past following the verbal same steps than for the user-friendly method (via the buttons)
- Copy the code executed in the console and paste it in the text editor (i.e., your script)
I recommend this method for several reasons. First, you do not need to remember the setwd() function. Second, y'all will not brand typos in the path of your folder (path which can sometimes be quite long if you have folders within folders). Third, when saving your script (which I assume you do otherwise you would lose all your work), you also salve the deportment yous just made via the buttons. So when you reopen your script in the future, no thing what is the current directory, by executing your script (which now include the line of code for setting the working directory), yous will at the same fourth dimension specify the working directory yous selected for this project.
Import your dataset
Now that you lot have transformed your Excel file into a CSV file and you have specified the folder containing your data by setting the working directory, you are at present ready to really import your dataset. Remind that there are a two methods to import a file:
- in a convenient way
- via the text editor (encounter also below why it is my preferred option)
No affair which method you lot choose, it is a good practice to showtime open up your file in TextEdit (on Mac) or Notepad (on Windows) in order to see the raw data. If you open the file in Excel y'all will run across the data already formatted and thus miss some important data needed for the importation. Below an example of raw data:
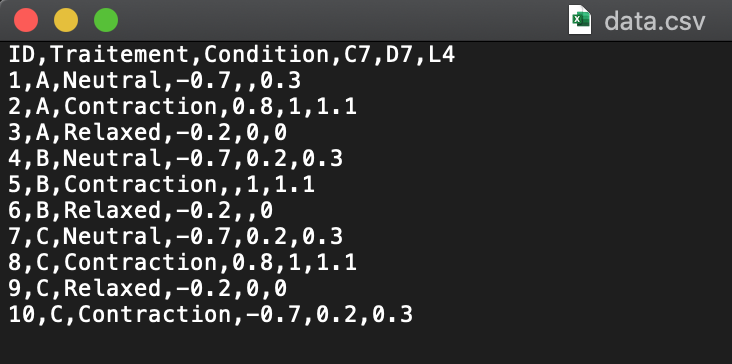
Example of raw data
There are a few things we need to look for in club to properly import our dataset:
- Are the variables names present?
- How are the values separated? Comma, semicolon, whitespace, tab?
- Is the decimal a signal or a comma?
- How are specified missing values? Empty cells, NA, null, O, other?
Convenient fashion
As shown below, simply click on the file > Import Dataset…
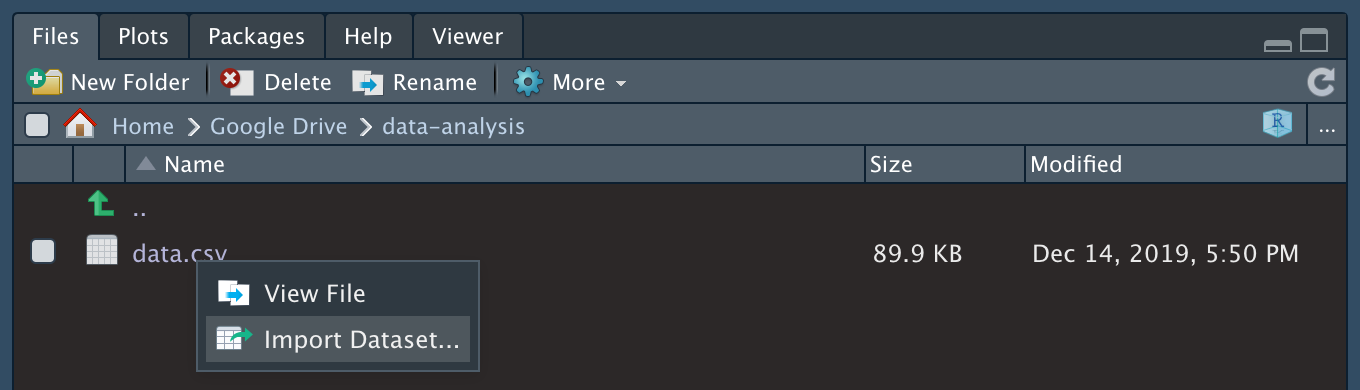
Import dataset in RStudio
A window which looks like this will open up:

Import window in RStudio
From this window, you lot can accept a preview of your data, and more importantly, bank check whether your data seems to have been imported correctly. If your data have been correctly imported, you can click on "Import". If this is non the case, you can alter the import options at the lesser of the window (below the data preview) corresponding to the information you gathered when looking at the raw data. Below, the import options yous will most probable use:
- Name: set the name of your data set (default is the proper name of the file). Avoid special characters and long names (every bit you volition have to blazon the proper noun of your dataset several times). I personally rename my datasets with a generic proper name such as "dat", others use "df" (for dataframe), "data", or even "my_data". You could use more explicit names such every bit "tennis_data" if you are using data on lawn tennis matches for example. Nonetheless, the main drawback with using specific names for datasets is that if, for case, you want to reuse the code you created while analysing tennis data on other datasets, you will need to edit your code past replacing all occurrences of "tennis_data" by the name of your new dataset
- Skip: specify the number of acme rows you want to skip (default is 0). Most of the time, 0 is fine. However, if your file contains some bare rows at the pinnacle (or information you lot want to disregard), set up the number of rows to skip
- Outset Row every bit Names: specify whether the variables names are nowadays or not (default is that variables names are present)
- Delimiter: the character which carve up the values. From our raw data above, you tin meet that the delimiter is a comma (","). Change it to semicolon if your values are separated past ";"
- NA: how missing values are specified (default is empty cells). From our raw data above, y'all tin can see that missing values are simply empty cells, so exit NA to default or change it to "empty". Change this option if missing values in your raw information are coded as "NA" or "0" (tip: do not code yourself missing values as "0", otherwise you volition not exist able to distinguish the true zero values and the missing values)
Later irresolute the import options corresponding to your data, click on "Import". You lot should now see your dataset in a new window and from in that location you can beginning analyzing your information.
This user-friendly method has the advantage that you lot practice non need to remember the lawmaking (run into the adjacent department for the unabridged code). However, the master drawback is that your import options will not be saved for a hereafter usage then y'all will need to import your dataset manually each time yous open RStudio.
Via the text editor
Similarly to setting the working directory, I too recommend using the text editor instead of the convenient method for the simple reason that you lot can save your import options when using the text editor (and not when using the user-friendly method). Saving your import options in your script (thanks to a line of code) allows you to chop-chop import your dataset the exact same way without having to repeat all the necessary steps every time you import your dataset. The command to import a CSV file is read.csv() (or read.csv2() which is equivalent simply with other default import options). Here is an instance with the aforementioned file than in the convenient method:
dat <- read.csv( file = "data.csv", header = Truthful, sep = ",", dec = ".", stringsAsFactors = Truthful ) -
dat <-: name of the dataset in RStudio. This ways that later importation, I will demand to refer to the dataset by callingdat -
file =: proper name of the file in the working directory. Exercise not forget "" around the name, the extension .csv at the end and the fact that RStudio is case sensitive ("Data.csv"volition give an error) and infinite sensitive within "" ("data .csv"volition also throw an error). In our case the file is named "data.csv" sofile = "information.csv" -
header =: are variables names present? The default isTrue, modify it toFauxif information technology is not the case in your dataset (TRUEandFALSEare always in capital letters,truewill not work!) -
sep =: separator. Equivalent to delimiter in the user-friendly method. Do not forget the "". In our dataset the separator of the values is a comma and thensep = "," -
dec =: decimal. Exercise non forget the "". In our dataset, the decimal for the numeric values is a point, and sodecember = "." -
stringsAsFactors =: should graphic symbol vectors be converted to factors? The default option used to beTruthful, but since R version four.0.0 information technology isFALSEby default. If all your character vectors are actually qualitative variables (so factors in R), fix it toTRUE - I exercise not write that missing values are coded every bit empty cells in my dataset considering information technology is the default
- Last merely not to the lowest degree, practice not forget that the arguments are separated past a comma
Other arguments be, run ?read.csv to see all of them.
Later the importation y'all can bank check whether your data take been correctly imported by running View(dat) where dat is the name you chose for your data. A window, similar than for the user-friendly method, will display your data. Alternatively y'all can also run head(dat) to meet the offset half-dozen rows and cheque that information technology corresponds to your Excel file. If something is not correct, edit the import options and check once again. If your dataset has been correctly imported, you tin now start analyzing your information. See other articles on R if you lot want to learn how.
The reward of importing your dataset directly via the code in the text editor is that your import options volition exist saved for a future usage, preventing you from importing information technology manually every time you open your script. Y'all will, still, need to remember the function read.csv() (not the arguments since y'all can always check them in the help documentation).
Import SPSS (.sav) files
Only Excel files are covered in details here. However, SPSS files (.sav) can too be read in R by using the post-obit command:
library(foreign) dat <- read.spss( file = "filename.sav", apply.value.labels = TRUE, to.data.frame = True ) The read.spss() function outputs a data table which retrieves all the characteristics of the .sav file, including the names given for the different levels of the chiselled variables and the characteristics of the variables. If you need more information about this command, encounter the help documentation (library(foreign) then ?read.spss).
Thanks for reading. I hope this article helped you to import an Excel file in RStudio. At present that your dataset is correctly imported, learn how to manipule it or how to perform descriptive statistics in R.
Every bit e'er, if you have a question or a suggestion related to the topic covered in this commodity, please add it as a comment and then other readers tin can benefit from the discussion.
Get updates every time a new article is published.
No spam and unsubscribe anytime.
Source: https://statsandr.com/blog/how-to-import-an-excel-file-in-rstudio/
Post a Comment for "How to Upload .csv File Into Rstudio From Chromebook"